Whether you’re upgrading to a new sink or dealing with a failing drain assembly, knowing how to plumb a kitchen sink drain is one of the most practical home improvement skills you can have. Done correctly, it takes two to three hours, requires no special license, and saves you hundreds of dollars in plumber fees. This guide covers everything from the first tool you’ll pick up to the final leak test including configurations most guides ignore, such as double-bowl sinks, garbage disposal connections, and non-standard sink materials.
What to Know Before You Start
Before you touch a single pipe, it pays to understand what you’re getting into. Kitchen sink drain plumbing is rated as an easy DIY task but “easy” still means attention to detail, the right materials, and respect for local codes. Taking five minutes to plan ahead prevents the most common and frustrating mistakes.
Skill Level, Time, and Cost Expectations
Most homeowners with basic DIY experience can complete a standard kitchen sink drain installation in two to three hours. This Old House rates it a 1 out of 5 for difficulty, which reflects that no advanced skills are required just patience and methodical work. Budget between $150 and $500 for materials depending on the scope of the project and the pipe material you choose (source: Angi). A simple single-bowl drain swap using PVC will sit at the low end of that range. A full double-bowl plumbing setup with new supply lines, a garbage disposal, and chrome-plated brass fittings can push toward the higher end.
When to DIY vs. Hire a Professional
Most standard drain installations are well within DIY territory. However, there are situations where calling a licensed plumber is the smarter choice. If your project involves moving the drain stub-out location in the wall, working with cast iron or galvanized steel pipes in an older home, or navigating a complex configuration like an island sink with remote venting, investing in professional plumbing repair is worth the cost. You should also consult a plumber if you’re unsure about your local plumbing codes some jurisdictions have specific requirements around venting, materials, and trap design that vary significantly from national standards.
How to Read a Kitchen Sink Drain Plumbing Diagram
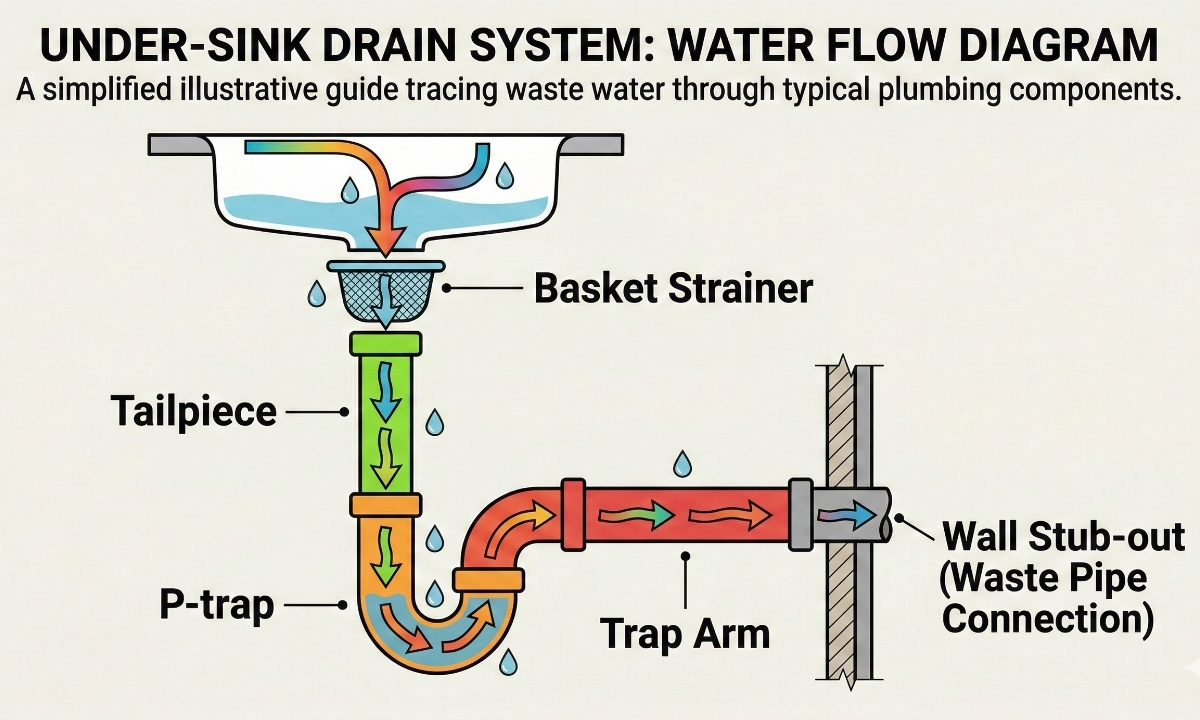
A basic kitchen sink drain diagram traces the path water takes from the basin to the municipal sewer or septic tank. Starting at the top: water flows through the basket strainer into the tailpiece (the short vertical pipe below the sink). The tailpiece connects to the P-trap — a curved, U-shaped section that holds a small amount of water at all times to block sewer gases from entering the home. From the P-trap, a horizontal pipe called the trap arm runs into the wall stub-out, which connects to the home’s main drain stack. In a double-bowl setup, a T-fitting joins both drain lines before the shared P-trap. Understanding this flow makes every step of installation logical rather than mechanical.
Tools and Materials You’ll Need
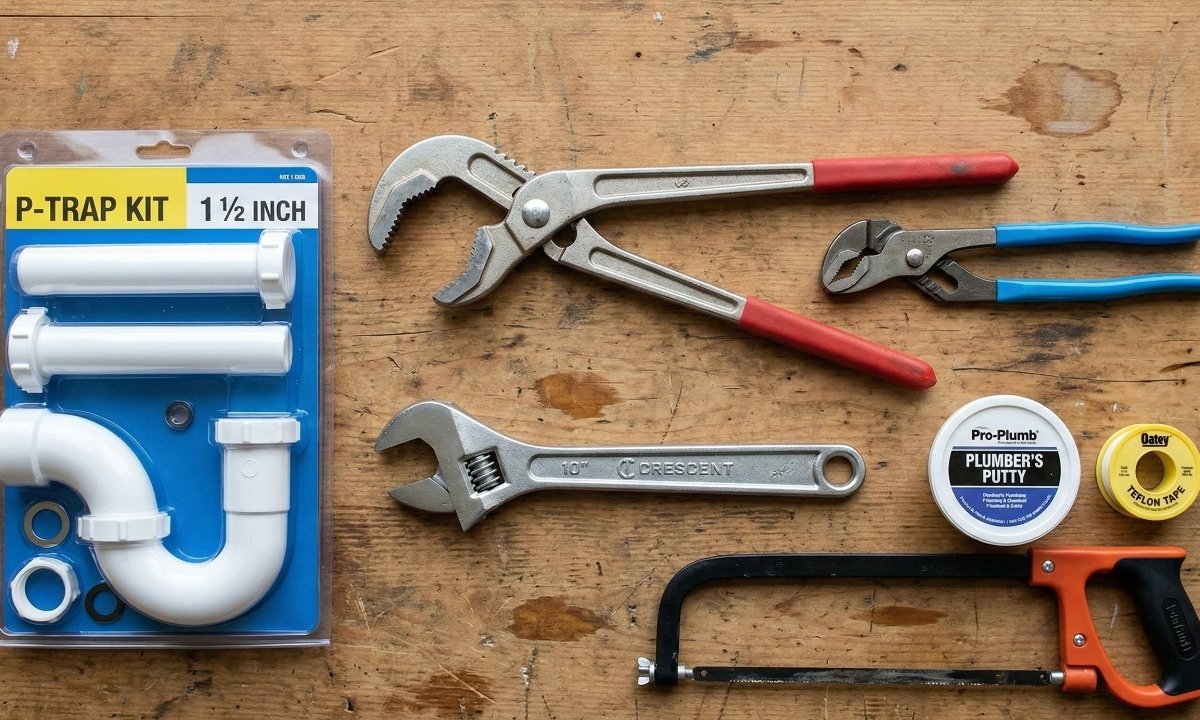
Having the right tools on hand before you start prevents mid-project hardware store runs. Most of what you need is either already in a standard toolbox or inexpensive to pick up.
Essential Tools
- Adjustable wrench
- Channel-lock (tongue-and-groove) pliers
- Basin wrench essential for tightening locknuts in tight spaces under the sink
- Pipe wrench
- Hacksaw or PVC/ABS pipe cutter
- Measuring tape
- Bucket and old towels (for catching residual water)
- Flashlight or work light
- Safety glasses
💡 Pro Tip: A basin wrench is the one specialty tool worth buying. Its swiveling jaw reaches nuts that are physically inaccessible with standard pliers.
Materials and Fittings
- Basket strainer assembly (strainer body, rubber gasket, friction washer, locknut)
- Tailpiece (typically 6–12 inches long, 1-1/2 inch diameter)
- P-trap (standard kitchen size: 1-1/2 inch)
- Trap arm and wall fitting
- Slip nuts and washers
- Compression nut and plastic washer
- Plumber’s putty or 100% neutral cure silicone sealant
- Teflon tape (PTFE tape) for threaded connections
- Pipe dope for metal-to-metal connections
- ABS cement (if working with ABS pipe)
Choosing the Right Pipe Material (PVC vs. ABS vs. Chrome Brass)
The three most common drain pipe materials each have strengths and trade-offs. PVC (white) is lightweight, easy to cut, widely available, and resistant to most household chemicals — it’s the most popular choice for new installations. ABS (black) is similar to PVC but slightly more impact-resistant and easier to glue; it’s common in older homes and in some regions where it’s the local standard. Chrome-plated brass is the most attractive option for exposed drain configurations under open shelving or pedestal sinks, and it handles higher temperatures better than plastic but it costs more and requires more care during installation to avoid stripping threads. Whatever material you choose, never mix metal types in the same drain run. Joining copper to galvanized steel or brass to chrome without a dielectric fitting creates galvanic corrosion, which will cause premature pipe failure.
Safety Precautions
Plumbing work is safer than most home improvement tasks, but skipping a few basic precautions can turn a routine job into a costly or dangerous one.
Shutting Off Water Supply and Disconnecting Power
Before doing anything else, locate the hot and cold shut-off valves beneath the sink and turn them clockwise until they stop. If your sink lacks individual stop valves, shut off the main water supply to the house. Turn on the faucet afterward to bleed any remaining pressure from the lines. If your sink includes a garbage disposal, unplug it from the outlet under the sink — or switch off the corresponding circuit breaker if it’s hardwired. Water and electricity in close proximity is a serious hazard, and this step is non-negotiable.
Protective Gear and Workspace Prep
Wear safety glasses throughout the job pipe cutting sends small shards, and reaching under a sink can expose your eyes to debris and residual water. Waterproof gloves are worth wearing when handling old drain assemblies, which can carry bacteria from years of organic buildup. Place a bucket directly under the trap before disassembly; even with the water off, the P-trap holds a full slug of standing water. Lay old towels around the cabinet base to catch any spillage and protect cabinet flooring from moisture damage.
Ventilation and Chemical Safety
If you’re using ABS cement, PVC primer, or pipe dope, work with the cabinet doors open and ensure the room has good airflow. These solvents release fumes that can cause headaches or dizziness in an enclosed space. Avoid using aerosol drain cleaners before or during installation the residue left in pipes can cause chemical burns on contact with skin. Opt for mild, non-abrasive cleaners if you need to clear the existing drain before starting.
Step-by-Step: How to Plumb a Kitchen Sink Drain
Follow these steps in order. Each stage builds on the last, and skipping ahead is the most common source of do-overs.
Step 1 Prepare the Sink and Clean the Drain Hole
If you’re replacing an existing drain, start by removing the old assembly. Loosen the locknut from below using your basin wrench or channel-lock pliers, then lift the old strainer body out from the top of the sink. Use a putty knife or plastic scraper to remove all traces of old plumber’s putty or hardened sealant from the drain opening; the surface must be completely clean and dry for the new seal to hold. Inspect the drain hole for any cracks or chips, especially in cast iron or fireclay sinks. If you’re working with a brand-new sink, simply clean any manufacturing residue from around the drain opening with a damp cloth and allow it to dry fully.
Step 2 Install the Basket Strainer and Flange
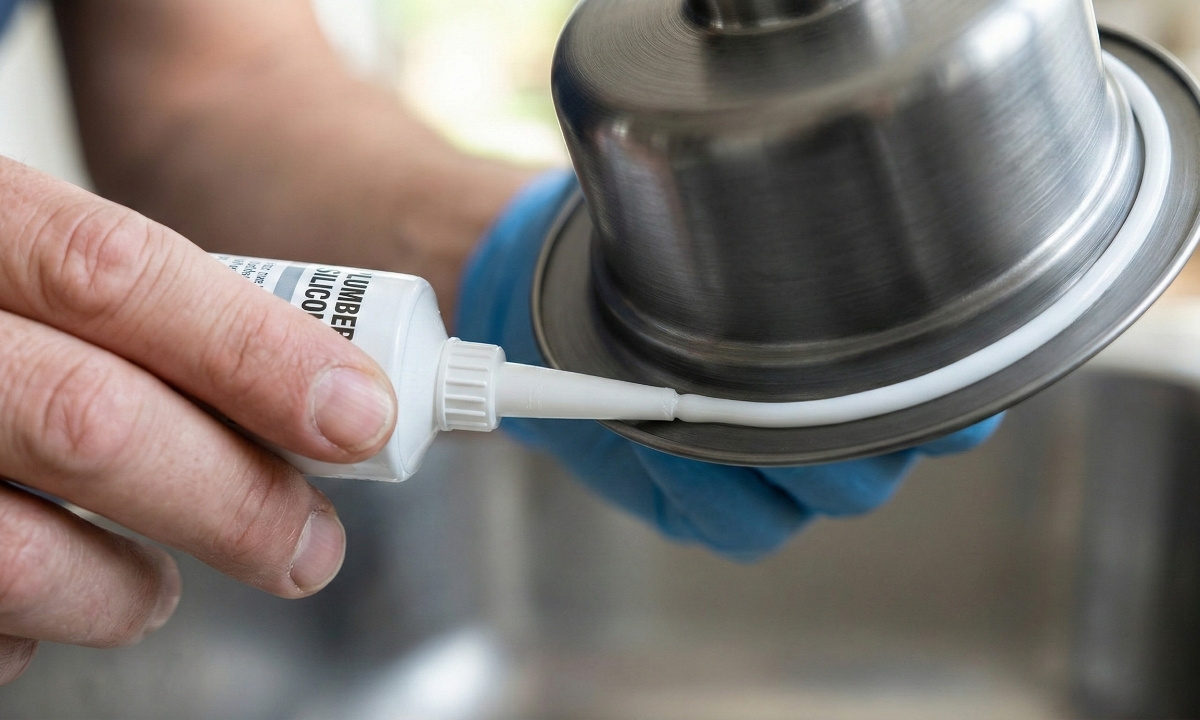
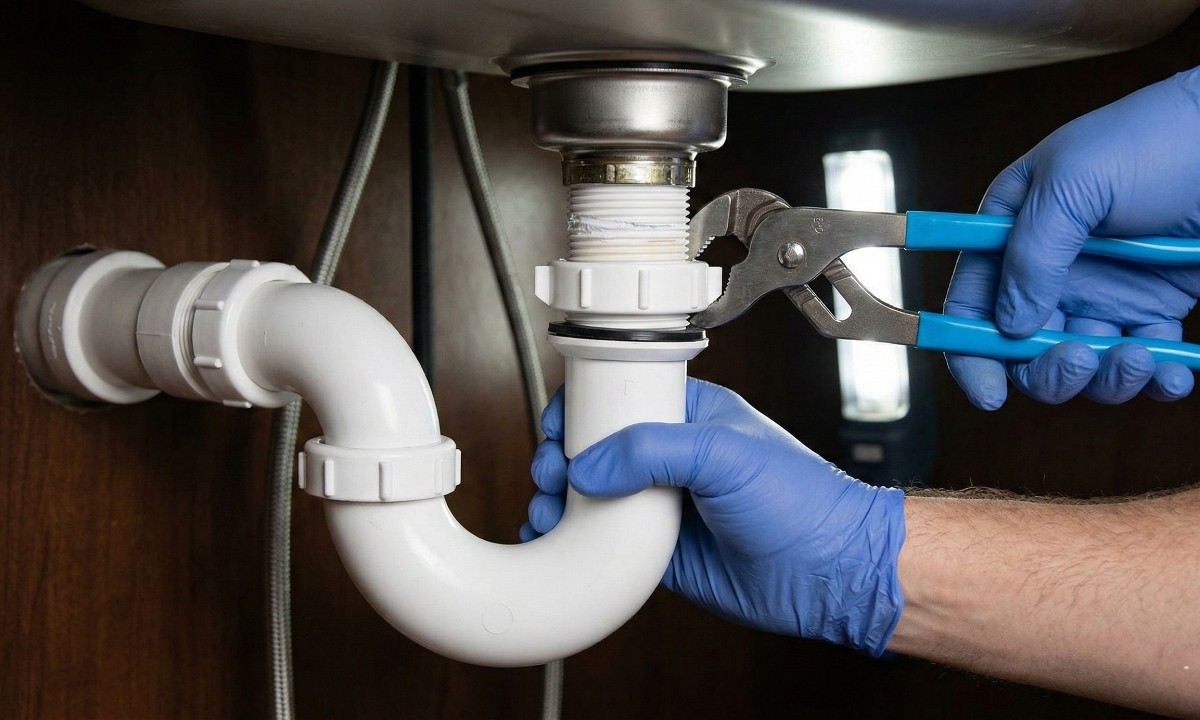
Roll a rope of plumber’s putty to about 3/8 inch in diameter and press it evenly around the underside lip of the strainer body or apply a continuous bead of 100% neutral cure silicone sealant if you prefer (see the sealant section for guidance on which to choose). Press the strainer body firmly down into the drain hole from above, centering it carefully. From underneath the sink, slide on the rubber gasket first, followed by the friction washer, followed by the strainer cup. Hold everything pressed upward against the sink and thread the locknut onto the strainer body by hand. Once hand-tight, use your basin wrench to finish tightening a firm, secure turn is all you need. Wipe away any sealant that squeezes out around the flange inside the sink basin. If installed into a fireclay or porcelain enamel sink, stop tightening before it feels fully snug; these surfaces crack under excess torque.
Step 3 Attach the Tailpiece
The tailpiece is the short vertical pipe that drops down from the bottom of the strainer body. Slide a slip nut and washer onto the tailpiece, then insert its upper end into the strainer outlet and hand-tighten the slip nut. Verify that the tailpiece hangs perfectly plumb use a small level if you want to be precise. An angled tailpiece disrupts flow and creates settling points for grease and debris. Standard tailpiece length is 6 to 12 inches; if your P-trap connection point requires a different length, tailpieces are easy to trim with a hacksaw or cut with a plastic pipe cutter. Deburr any cut edges with fine sandpaper or a utility knife before assembly.
Step 4 Assemble and Connect the P-Trap
Dry-fit all your P-trap components before gluing or final tightening. The P-trap connects to the bottom of the tailpiece on one side and to the trap arm the horizontal pipe running to the wall on the other. The trap arm slides into the wall stub-out. Position everything so the trap arm has a downward slope toward the wall of at least 1/4 inch per foot; this ensures water (and the solids it carries) moves toward the drain rather than pooling. The horizontal distance from the P-trap to the wall stub-out should not exceed 24 inches; longer runs create drainage problems and violate most codes. Once you’re satisfied with the fit and slope, tighten all slip nuts hand-tight, then give each an additional quarter turn with pliers. For ABS or PVC joints that require cement, apply the cement per manufacturer instructions and allow proper cure time before running water.
Step 5 Connect Water Supply Lines and Shut-Off Valves
If you’re also installing or replacing supply lines (hot and cold), this is the point to do it. Slide the compression nut onto the copper or braided supply line, then place the brass ferrule onto the pipe. Insert the pipe fully into the shut-off valve fitting, apply a small amount of pipe dope to the ferrule, and tighten the compression nut firmly using two adjustable wrenches one holding the valve body, one turning the nut. Connect the supply lines to the faucet inlets above, hand-tightening first and then snugging with a wrench. Avoid over-tightening threaded faucet connections, which are often plastic and prone to cracking under excess force.
Step 6 Test All Connections for Leaks
With everything assembled, slowly open the shut-off valves to restore water pressure. Watch the supply line connections for any dripping as pressure builds. Run water through the sink at full flow for at least 30 seconds, then place dry paper towels under each connection point in the drain system, the tailpiece slip nut, the P-trap connections, and the trap arm wall fitting. Any moisture on the paper towels indicates a leak. Tighten the relevant slip nut slightly and retest. If a joint continues to weep, disassemble it and inspect the washer a worn, cracked, or improperly seated washer is almost always the cause.
Plumbing Variations and Special Configurations
Standard single-bowl drain installation is the baseline, but many kitchens have configurations that require additional steps. Understanding these variations upfront prevents mid-installation surprises.
Double-Bowl Sink Plumbing (T-Fitting and Second Trap)
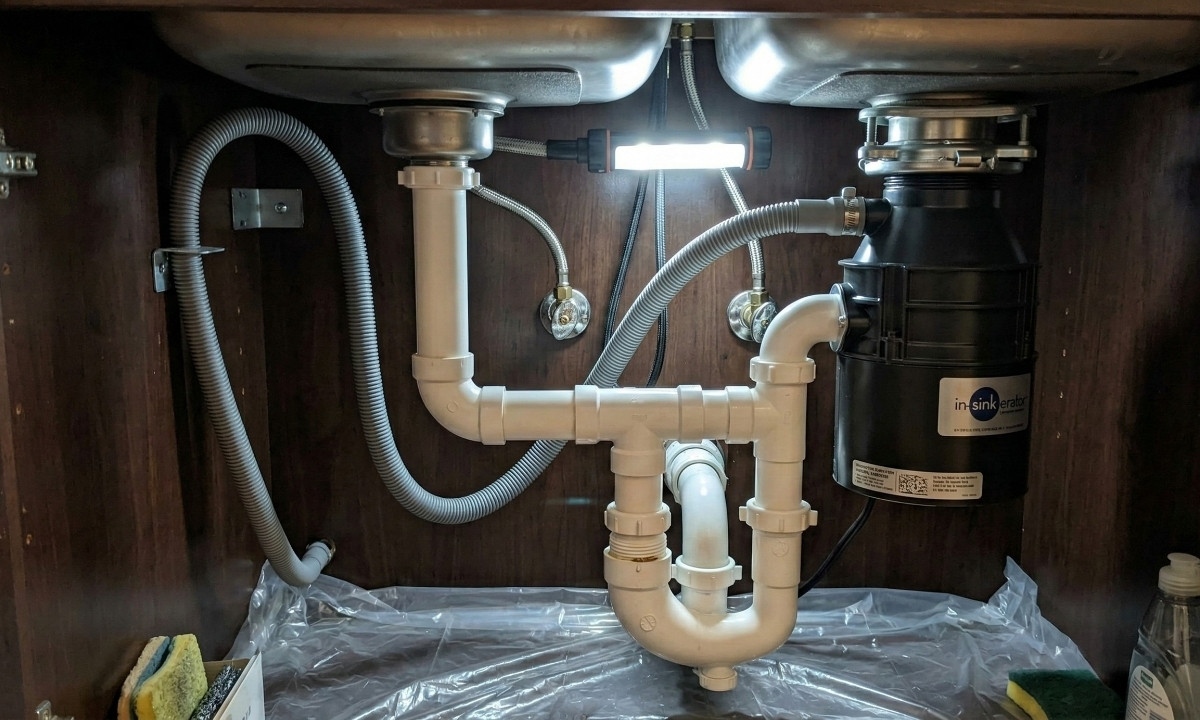
A double-bowl sink has two basins, each with its own strainer and tailpiece. Both drains ultimately connect to a single P-trap and wall stub-out. The standard approach uses a T-fitting to join the two drain lines. The tailpiece from the first (typically the primary) sink connects directly to the P-trap. The second sink’s tailpiece connects via a horizontal branch pipe to a T-fitting positioned above the P-trap inlet often using a short length of brass drainpipe to bridge the distance. The entire assembly then feeds into a single P-trap and trap arm. When fitting the horizontal branch line from the second sink, ensure it maintains a gentle downward slope toward the T-fitting to prevent standing water. Dry-fit everything carefully before final assembly, as the geometry of double-bowl configurations varies significantly between sink models and cabinet sizes.
Adding a Garbage Disposal
When a garbage disposal is part of the setup, it replaces the standard basket strainer on the primary (typically left) bowl. The disposal unit mounts to the sink flange from below and its outlet connects directly to the drain system via a discharge elbow. If your setup also includes a dishwasher, the disposal acts as the central connection point; the dishwasher drain hose connects to an inlet port on the side of the disposal body. Before installing the disposal, ensure the power supply is disconnected. If the disposal is new, check whether the dishwasher knockout plug inside the disposal inlet needs to be removed; this is a commonly overlooked step that causes dishwasher drain backups.
Connecting a Dishwasher Drain
If your kitchen has a dishwasher but no garbage disposal, the dishwasher’s drain hose connects to a dedicated inlet port on the tailpiece using a hose clamp. Route the drain hose in a high loop up to the underside of the countertop before descending to the connection point to prevent dirty sink water from siphoning back into the dishwasher. In some jurisdictions, an air gap device mounted on the countertop or sink deck is required in place of or in addition to the high loop; check your local plumbing code before deciding which method to use.
Non-Standard Sinks (Fireclay, Farmhouse, and Natural Stone)
Fireclay, cast iron, farmhouse apron-front, and natural stone sinks introduce unique installation considerations. Fireclay and porcelain enamel surfaces are brittle and can crack if the locknut is overtightened. Apply firm but moderate torque and consider using a nylon friction washer rather than metal to distribute the clamping load. Natural stone sinks (granite, marble, soapstone) often have thick basin walls, requiring a basket strainer with a longer flange to achieve a proper fit standard flanges may not reach far enough to thread the locknut. Measure your sink’s drain hole depth before purchasing a strainer. Farmhouse sinks with thick apron fronts typically have standard drain openings, but their extra weight and depth may require a slightly longer tailpiece. Always consult the sink manufacturer’s installation documentation for material-specific guidance.
How to Ensure a Leak-Proof Seal
The quality of your seal determines whether your installation lasts five years or fifty. A few minutes of care at each connection point pays enormous dividends over the life of the drain.
Plumber’s Putty vs. Silicone Sealant Which Should You Use?
This is one of the most debated topics in sink installation, and the honest answer is: it depends on your sink material. Plumber’s putty is a soft, pliable clay-like compound that creates an excellent watertight seal around the strainer flange. It’s easy to work with, stays flexible over time, and is simple to remove if you ever need to reseat the drain. However, plumber’s putty can stain or damage some materials particularly natural stone, composite granite, and certain solid surface sinks by leaching oils into the substrate. Silicone sealant (specifically 100% neutral cure silicone, not acetic acid-cure) is a better choice for these materials. It forms a strong, waterproof bond, is available in colors that match most sink finishes, and is safe for all sink materials. The downside is that cured silicone is harder to remove cleanly if you need to replace the strainer later. When in doubt, check your sink manufacturer’s recommendation, many explicitly specify which sealant to use, and using the wrong one can void your warranty.
Proper Tightening Technique (and How to Avoid Over-Tightening)
The universal rule across all drain connections is hand-tight plus a quarter turn with a wrench. This applies to slip nuts on plastic fittings, the strainer locknut, and supply line compression fittings alike. Slip nuts on PVC or ABS pipe are especially vulnerable to cracking under excess torque; the plastic only needs enough compression to seat the washer against the pipe wall. Metal-to-metal connections can tolerate slightly more torque, but even here, over-tightening strips threads rather than creating a better seal. If a connection leaks after hand-tight-plus-quarter-turn, the issue is almost always a damaged washer or improper seating, not insufficient tightening. Remove the fitting, inspect the washer, reseat, and retry before reaching for the wrench again.
Key Measurements and Slopes to Get Right
Four measurements govern whether your drain system will flow cleanly and pass inspection. First, the drain hole diameter: kitchen sink drains are universally 3-1/2 inches this is standard across virtually all sink brands and styles. Second, the P-trap diameter: kitchen sinks require a 1-1/2 inch P-trap (different from bathroom sinks, which use 1-1/4 inch). Third, the drain pipe slope: maintain a drop of 1/4 inch per foot on all horizontal drain runs enough to keep water moving without creating turbulence. Fourth, the P-trap to wall distance: the trap arm should not exceed 24 inches in length. Beyond this distance, the drain loses adequate slope and siphoning becomes a risk, which can allow sewer gases to bypass the trap seal.
Using Teflon Tape and Pipe Dope on Threaded Connections
Teflon tape (also called PTFE tape) is used on male threaded connections and wraps clockwise around the threads two to three times before assembly. It fills microscopic gaps in the thread profile and prevents metal-to-metal galling. Pipe dope (pipe thread compound) serves a similar purpose but is better suited for metal compression fittings, particularly at shut-off valve connections. For plastic slip-joint connections with rubber washers, neither tape nor dope is needed or helpful the washer provides the seal. Using Teflon tape on slip-joint plastic connections actually reduces friction in a way that can cause the nut to over-tighten without feeling it, increasing the risk of cracking the fitting.
Common Mistakes and How to Troubleshoot Them
Even experienced plumbers encounter issues on sink installations. Knowing what to look for and why it happens makes troubleshooting fast and effective.
| Problem | Likely Cause | Fix |
| Slow drainage | Incorrect slope or partial clog | Re-check trap arm slope (1/4″ per foot); clear any debris |
| Gurgling sounds | Poor venting / air lock in drain | Install a mini-vent or air admittance valve on the drain line |
| Foul odors | P-trap dried out or improperly sealed | Run water to refill trap; check trap arm slope isn’t too steep |
| Leak at slip joint | Worn or improperly seated washer | Disassemble, replace washer, reseat and retighten |
| Leak at strainer flange | Insufficient or degraded sealant | Remove strainer, clean thoroughly, re-apply sealant |
| Dripping at supply line | Loose compression nut or bad ferrule | Tighten nut; replace ferrule if deformed |
Misaligned or Improperly Sloped P-Trap
A P-trap that isn’t level side-to-side will cause water to pool asymmetrically in the trap, potentially allowing sewer gases to escape through the side that stays dry. A trap arm that slopes too steeply downward toward the wall more than the recommended 1/4 inch per foot will actually siphon the water out of the trap over time, removing the gas seal entirely. Use a torpedo level when setting the trap arm, and take the time to adjust fitting positions before final tightening.
Slow Drainage, Gurgling, or Foul Odors
Slow drainage is almost always one of three things: incorrect slope (fix the angle), a partial clog that requires drain cleaning, or a venting issue. Gurgling specifically indicates that air is being pulled through the drain water rather than through a dedicated vent this happens when the drain system lacks adequate venting. A mini-vent valve (also called an air admittance valve or AAV) can be installed directly on the drain line to allow air in without requiring a full roof vent. Foul odors with no visible trap issue often mean the trap arm is angled too steeply, causing the trap water to siphon out between uses. Correct the slope and the smell will typically resolve within a few days.
Leaks at Connection Points
The most common post-installation leak is at a slip nut joint, and the most common cause is a missing, inverted, or cracked washer. Before reinstalling a slip nut, hold the washer up to the light any visible cracks, flat spots, or deformation means it needs to be replaced. Washers are inexpensive and sold in assortment packs; keeping a few spare sizes under the sink is good practice. If a metal-threaded connection weeps, try a second wrap of Teflon tape and retighten. If it continues to leak, the fitting may have cross-threaded during installation, disassembled completely, inspected the threads, and started over.
Mixing Metals and Galvanic Corrosion
Galvanic corrosion occurs when two dissimilar metals are in contact in the presence of water, creating a low-level electrochemical reaction that corrodes the less noble metal over time. In practical drain terms, this means avoiding direct contact between copper and galvanized steel, or between brass and chrome-plated zinc fittings of different base metals. The fix is simple: use all plastic, all brass, or all chrome fittings in a single drain run and use dielectric unions at any point where dissimilar metals must meet. This issue is more relevant for supply lines than drain lines, but is worth keeping in mind when replacing individual components in an older mixed-metal system.
Post-Installation Checks and Long-Term Maintenance
Installation is only the beginning. A brief post-installation checklist and a minimal maintenance routine will extend the life of your drain system significantly.
Post-Installation Testing Checklist
- Open shut-off valves slowly and inspect supply line connections for dripping as pressure builds
- Run cold water at full flow for 60 seconds; check all drain connections with dry paper towels
- Run hot water at full flow for 60 seconds; repeat paper towel check (thermal expansion can reveal loose joints)
- Fill each sink basin to the overflow level and then open the drain full-volume drainage tests the system under load
- If a garbage disposal is installed, run it with water flowing and check all connections during operation (vibration can loosen slip joints)
- If a dishwasher drain is connected, run a short wash cycle and inspect the hose connection and clamp for leaks
Monthly and Quarterly Maintenance Habits
Monthly: flush each drain with a full kettle of near-boiling water. This softens and dislodges grease deposits before they accumulate into blockages. Avoid chemical drain cleaners for routine maintenance — they degrade rubber washers and gaskets over time and can damage plastic fittings with repeated use. Quarterly: unscrew the P-trap cleanout plug (or remove the trap entirely) and clear any accumulated debris. While the trap is accessible, inspect the slip nut washers for early signs of cracking or deformation. A five-minute quarterly inspection prevents the emergency plumbing calls that come from years of neglect..
When to Inspect and Replace Worn Parts
Rubber washers and gaskets should be inspected annually and replaced if they show any visible cracking, flattening, or brittleness. Most last three to seven years depending on water temperature, chemical exposure, and how often the connections are disturbed. The basket strainer itself may need replacement if the strainer mesh becomes corroded or the sealing surface chips chrome and stainless steel strainers typically last ten or more years, while lower-quality plated zinc strainers may show corrosion within two to three years. If you notice a persistent slow drain that clearing the trap doesn’t resolve, the issue may be deeper in the drain line and worth a professional camera inspection.
Frequently Asked Questions
What size P-trap does a kitchen sink require?
Kitchen sinks require a 1-1/2 inch P-trap. This is larger than the standard bathroom sink P-trap, which measures 1-1/4 inch. Using the wrong size creates a poor seal at the connection points and may not meet local code requirements. When purchasing replacement parts, always verify the diameter before buying.
Can I use silicone instead of plumber’s putty on a kitchen drain?
Yes 100% neutral cure silicone is a safe and effective alternative to plumber’s putty, and it is actually the preferred choice for natural stone, composite granite, and porcelain enamel sinks where putty’s oils can cause staining or damage. For stainless steel sinks, either product works well. The key with silicone is using the correct type: neutral cure (not acetic acid cure) and allowing full cure time before running water, typically 24 hours.
How much does it cost to plumb a kitchen sink drain?
A basic DIY kitchen sink drain installation runs between $150 and $500 in materials (source: Angi). At the lower end, a single-bowl PVC drain assembly with a new basket strainer and supply lines typically costs $50 to $150 in parts. A more comprehensive project covering a double-bowl setup, new shut-off valves, chrome-plated fittings, and a garbage disposal can reach $300 to $500 in materials. Hiring a plumber adds $100 to $300 or more in labor depending on your region and the complexity of the job.
Does a kitchen sink drain need to be vented?
Yes, all plumbing drain systems require venting to function properly. Without a vent, the draining water creates a vacuum that pulls air through the trap seal, which allows sewer gases into the home and causes the gurgling sounds you may have heard from a poorly plumbed sink. Most kitchens are vented through the home’s main drain stack via a vent pipe that exits through the roof. If your kitchen is in an island location or an addition where a roof vent isn’t practical, an air admittance valve (AAV or mini-vent) can be installed directly in the drain line to satisfy the venting requirement. Check local codes, as some jurisdictions restrict AAV use.
Can a P-trap be lower than the drain pipe?
No. A P-trap that sits lower than the outlet drain pipe (the wall stub-out) will not drain correctly. Water flowing into a low trap lacks the momentum to push sediment and debris through the system, leading to clogs and slow drainage. The trap arm of the horizontal pipe connecting the P-trap to the wall must slope gently downward toward the wall at 1/4 inch per foot. The top of the P-trap inlet should be at or slightly above the centerline of the wall drain opening.
Conclusion
Knowing how to plumb a kitchen sink drain puts one of the most practical home maintenance skills directly in your hands. From selecting the right pipe material and sealant to assembling a double-bowl configuration or connecting a dishwasher drain, this guide has walked you through every step and variation you’re likely to encounter.
The key takeaways are straightforward: prepare your workspace, measure carefully, maintain the correct slope throughout the drain run, and test thoroughly before calling the job done. The four critical numbers to remember are 3-1/2 inches (drain diameter), 1-1/2 inches (P-trap size), 1/4 inch per foot (drain slope), and 24 inches (maximum trap arm length). Get those right, and you have the foundation of a leak-free, code-compliant installation.
If your project involves something beyond a standard single-bowl replacement, a non-standard sink material, an island kitchen, or a configuration that requires moving existing drain lines don’t hesitate to consult a licensed plumber. The cost of a consultation is far less than the cost of water damage from a hidden leak.
Ready to get started? Gather your tools, pick up the right materials for your specific sink, and work through each step with confidence. Your kitchen drain is one of the hardest-working components in your home. It deserves a proper installation.