Quick-connect plumbing fittings are one of the most convenient innovations in modern plumbing. They allow you to make secure, leak-free connections in seconds, no soldering, no threading, no specialized plumbing experience required. But what happens when you need to take one apart? Whether you’re replacing a filter, upgrading a line, or troubleshooting a leak, knowing how to remove quick-connect plumbing fittings correctly can save you time, frustration, and a very wet floor.
The good news is that disconnecting these fittings is just as straightforward as installing them as long as you understand how they work and follow the right steps. This guide covers everything from basic hand removal to tackling stubborn fittings in tight spaces, with brand-specific tips for John Guest and SharkBite fittings included. Whether you’re a first-timer or just need a refresher, this is the most complete resource you’ll find on the topic.
What Is a Quick-Connect Plumbing Fitting and How Does It Work?
Before you attempt to remove a quick-connect fitting, it helps to understand what’s happening inside it. These fittings are engineered to be simple, but their internal mechanics are precise. A misunderstanding of how they work is often the reason people struggle to disconnect them or damage them in the process.
Quick-connect fittings are used across a wide range of residential and commercial plumbing applications from under-sink reverse osmosis systems and refrigerator water lines to espresso machines, water coolers, and whole-house filtration setups. Their popularity comes from their reliability and ease of use, but that same locking mechanism that makes them so secure is exactly what makes removal feel tricky if you don’t know what you’re doing.
The Three Core Components (Body, Collet, and O-Ring)
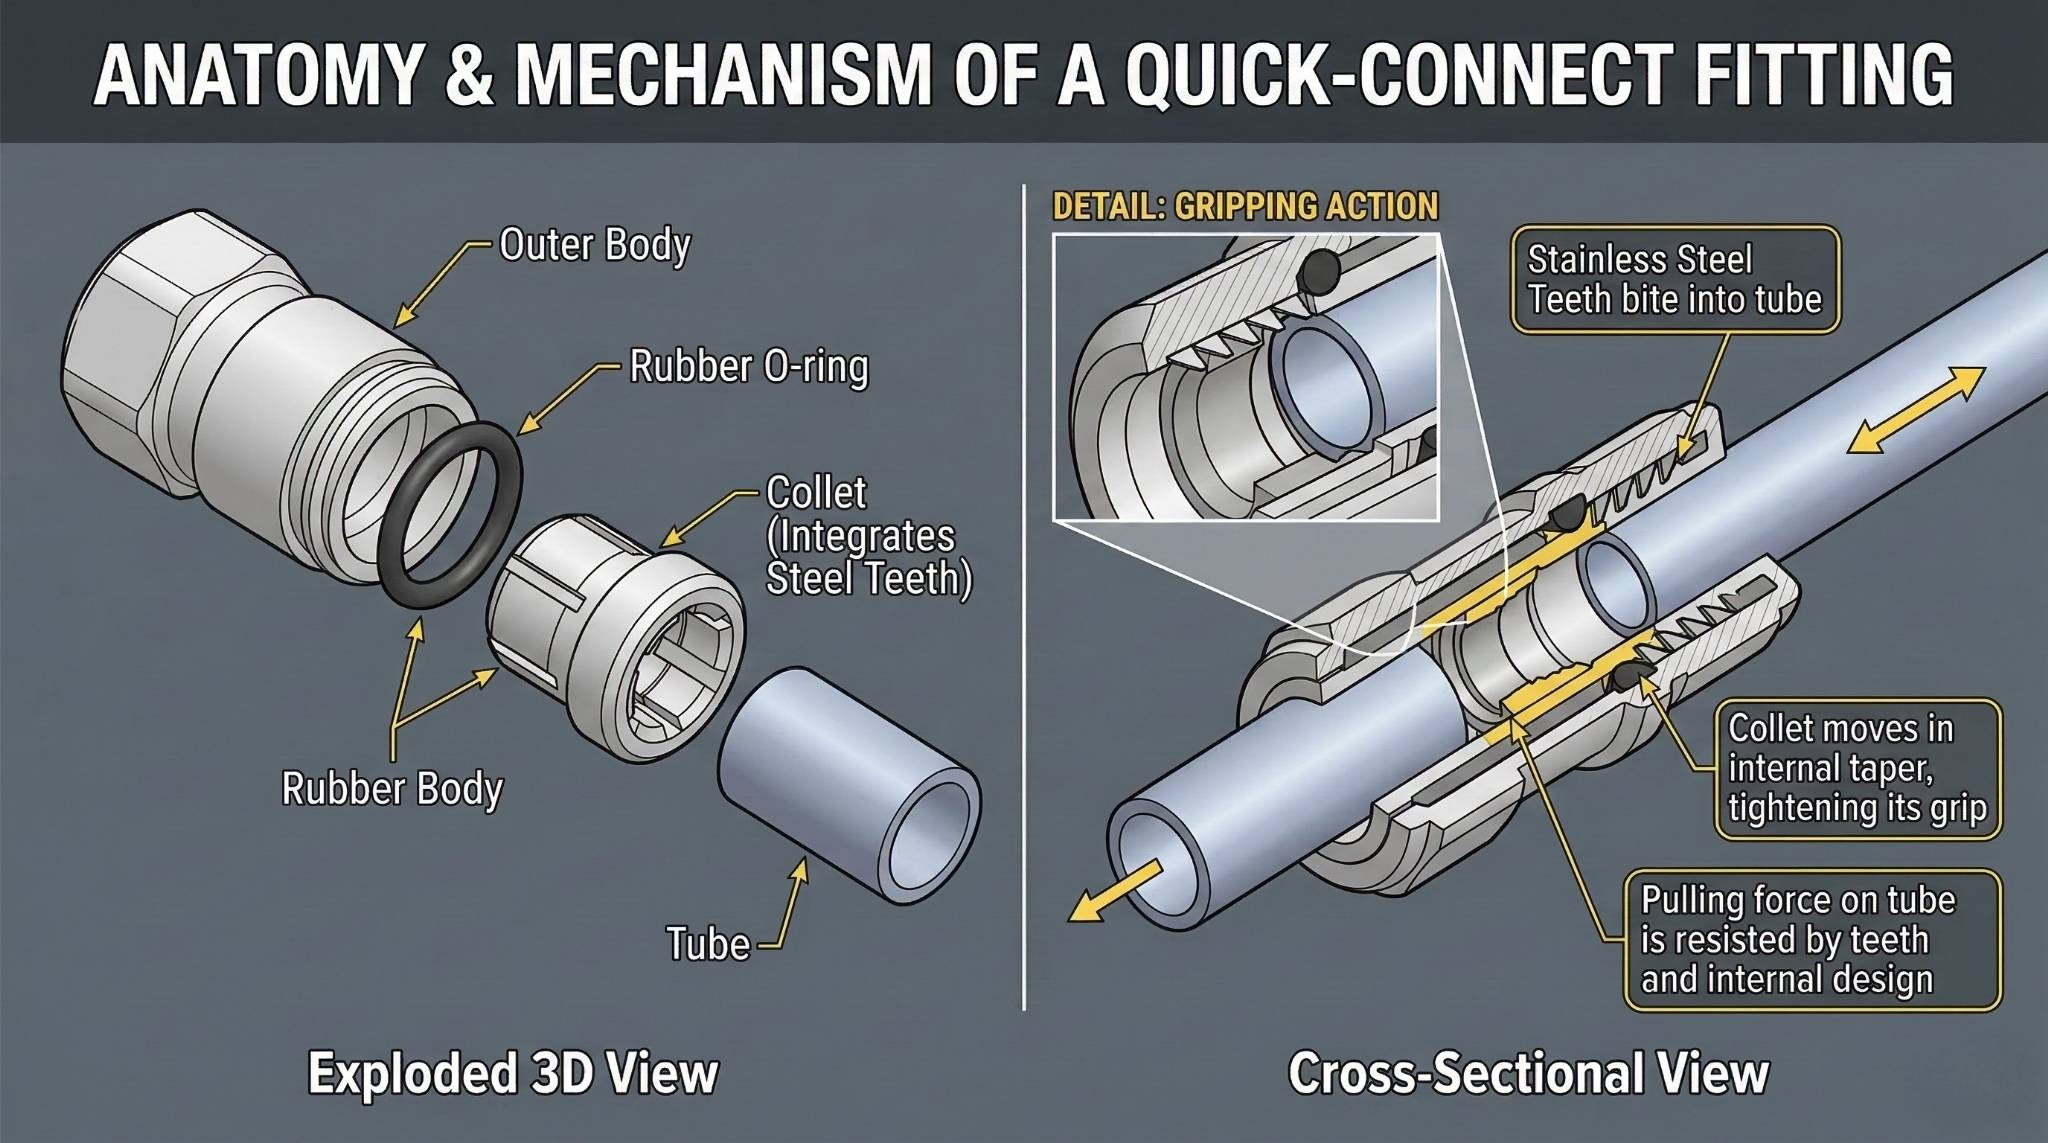
Every standard quick-connect fitting is built around three components:
The body is the outer shell of the fitting. It holds everything together and provides the channel through which water flows. The inside of the body tapers slightly near the opening, and that taper is what activates the locking mechanism when tubing is inserted.
The collet (sometimes called the gripper or release ring) sits inside the mouth of the fitting. It contains a ring of small, angled stainless steel teeth. These teeth are designed to bite into the tubing when pulled outward, creating a grip that tightens under pressure. This is what keeps the tubing firmly in place during normal operation.
The O-ring sits deeper inside the body, behind the collet. It is a small rubber ring that compresses against the tubing to create a watertight seal. Without a properly seated O-ring, the fitting will leak regardless of how well the collet grips.
Understanding these three parts is essential because when you remove a quick-connect fitting, you are essentially reversing the action of all three simultaneously.
How the Collet Grips and the O-Ring Seals
When you push tubing into a quick-connect fitting, the collet is pushed back toward the tapered walls of the body. This causes the stainless steel teeth to angle inward and grip the outer surface of the tubing. The harder you pull the tubing outward, the more the taper drives the collet’s teeth deeper into the tube which is why simply yanking the tube never works.
The O-ring operates independently. As the tubing is pushed past the collet and toward the back of the fitting, it contacts and compresses the O-ring. That compression creates a seal tight enough to hold water pressure without any adhesive, clamp, or thread.
To disconnect the fitting, you need to manually push the collet inward away from the taper so that its teeth disengage from the tubing. Once the teeth release their grip, the tubing can be pulled free without resistance.
Common Types of Quick-Connect Fittings (John Guest, SharkBite, and Others)
Not all quick-connect fittings are identical, and the removal process varies slightly between brands and styles:
John Guest fittings are widely used in water filtration, RO systems, and beverage equipment. They follow the standard collet-and-O-ring design and are known for their precision tolerances and reliability. Their collets are typically small and flush-mounted, which can make them harder to grip with fingers alone.
SharkBite fittings use a push-to-connect design that works on copper, PEX, CPVC, and PE-RT pipe. They are more commonly found in general household plumbing rather than filtration systems. SharkBite fittings require a specific disconnect clip or SharkBite disconnect tong for proper removal; a standard collet push won’t work the same way.
Other brands including Speedfit, Watts, and various generic push-connect fittings generally follow the same collet-based principle as John Guest, with minor variations in collet size, depth, and material.
Tools You May Need Before You Start
One of the advantages of quick-connect fittings is that they are designed for tool-free installation. Removal is largely the same but depending on the age of the fitting, the water pressure it has been under, and how accessible it is, you may need a little extra help. Having the right tools nearby before you start will prevent frustration mid-job.
When You Can Remove a Fitting by Hand
For most standard quick-connect fittings that are in good condition and easily accessible, hand removal is entirely sufficient. If the fitting is relatively new, the tubing is in good shape, and you have enough clearance to get two fingers around the collet, you likely won’t need any tools at all. The standard technique of pressing the collet in with your thumb and index finger while pulling the tubing with your other hand works well in these situations.
Hand removal is most reliable on larger fittings (such as 1/2-inch or 3/8-inch sizes) where the collet ring is wide enough to press evenly. On smaller fittings, like 1/4-inch push-connect types common in RO systems, the collet is narrower and harder to depress evenly with fingers alone.
Collet Release Tools – What They Are and Where to Find Them
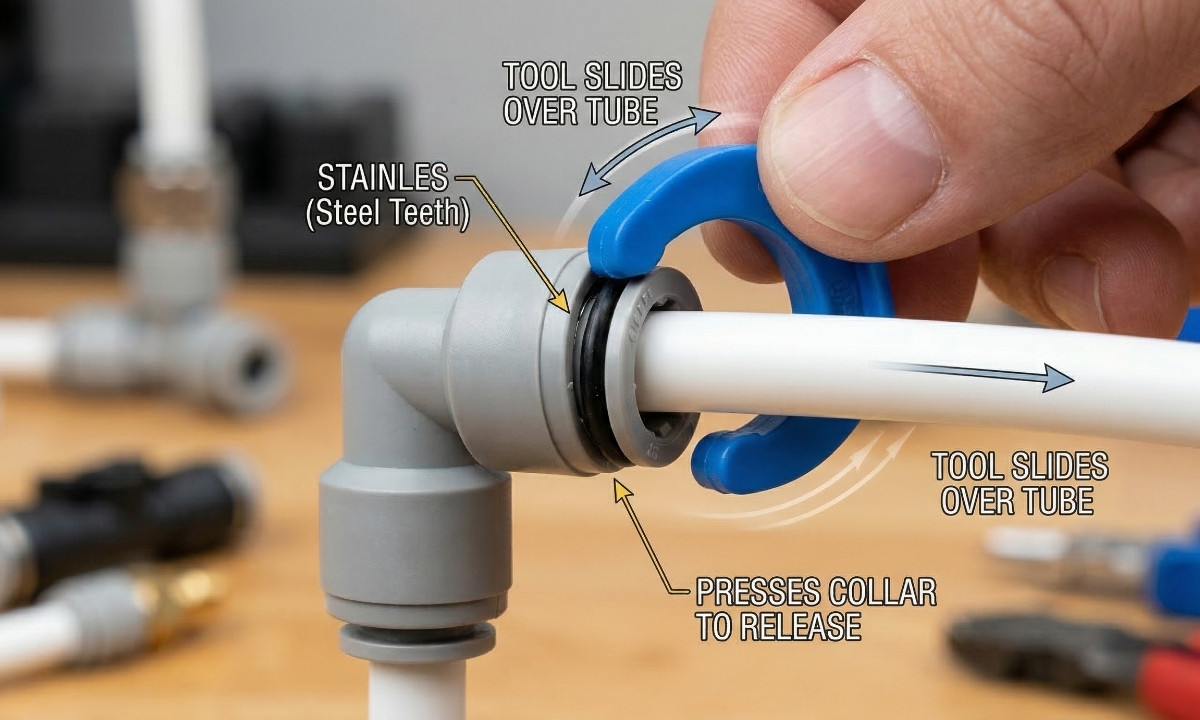
A collet release tool (sometimes called a disconnect clip or push-fit release tool) is a small, inexpensive device designed specifically to depress the collet on a quick-connect fitting evenly and deeply enough to release the tubing. They are typically made from plastic or thin metal and are shaped to slide over the tubing and push down on the collet ring simultaneously from all sides.
These tools are particularly useful for small-diameter fittings, older or stubborn connections, and situations where finger access is limited. They are available from most plumbing suppliers, hardware stores, and online retailers. John Guest and SharkBite both manufacture brand-specific release tools that are matched to their fitting dimensions; it’s worth buying the correct one for your fitting brand to avoid damaging the collet.
Collet release tools typically cost between $3 and $10, making them an inexpensive addition to any DIY toolkit.
Other Helpful Tools (Flat Screwdriver, Tube Cutter, Marker, Ruler)
Beyond the release tool, a few other items are worth having on hand:
Flat-head screwdriver: A small flat-head can be used to press down the collet on standard fittings when finger pressure isn’t enough. Use the flat edge carefully if you want to apply even pressure around the collet, not pry or lever against the fitting body.
Tube cutter: If the removed tubing is going to be reinstalled, you may need to trim the end to get a clean, square cut before reinserting. A purpose-made tube cutter produces a cleaner cut than scissors or a knife.
Marker and ruler: If you’re reinstalling tubing, marking the insertion depth (typically around 3/8 inch from the tube end) helps confirm the tubing is pushed all the way to the O-ring.
Towel or small bucket: There will almost always be residual water in the line even after depressurizing. Having something to catch drips keeps your workspace dry and prevents slip hazards.
How to Prepare for Safe Removal
Skipping the preparation steps is one of the most common and most avoidable mistakes people make when removing quick-connect fittings. Working on a pressurized, water-filled line is how you end up soaked, and in some cases, how fittings and tubing get damaged. Taking three minutes to prepare properly will make the entire process cleaner, safer, and easier.
Step 1 – Shut Off the Water Supply
Before touching any fitting, locate and turn off the water supply to the line you’re working on. For under-sink filtration systems, this is usually a dedicated shut-off valve on the cold water supply line beneath the sink. For refrigerator water lines or appliance connections, there is typically a dedicated inline valve or a shut-off at the wall.
If you cannot locate an inline shut-off valve for the specific line, turn off the main water supply to your home. It is always better to shut off more than necessary than to work on a live pressurized line.
Step 2 – Depressurize the System
Shutting off the water supply does not immediately remove pressure from the line. Water already in the pipes remains under pressure until it has somewhere to go. To depressurize the system, open a downstream faucet, dispenser, or valve connected to the same line. For an under-sink filter system, opening the dedicated filter faucet will release pressure from the tubing. Hold it open until the flow stops completely.
This step is critical. Attempting to remove a quick-connect fitting on a pressurized line can cause the tubing to eject forcefully when the collet is depressed, spraying water and potentially damaging the fitting or O-ring.
Step 3 – Drain Residual Water from the Line
Even after depressurizing, there will be water sitting in the tubing and fitting body. Before disconnecting, tilt the tubing downward if possible to encourage gravity drainage, and place a small towel or container beneath the fitting to catch any drips. For longer runs of tubing, you may need to gently squeeze or manipulate the line to work the remaining water toward the open end.
Taking this step protects your cabinetry, flooring, and any electrical components nearby from water damage.
How to Remove a Quick-Connect Fitting (Standard Method)
With your tools ready and the system safely depressurized, you’re ready to disconnect the fitting. The standard removal method works for the vast majority of quick-connect plumbing fittings and requires nothing more than your hands in most cases. Work deliberately and steadily this process should never require significant force.
Step 1 – Locate and Access the Collet
The collet is the ring-shaped component visible at the mouth of the fitting where the tubing enters. On most fittings, it protrudes slightly or sits flush with the fitting face. Before attempting removal, make sure you have clear visual and physical access to the collet. If the fitting is tucked behind a cabinet panel or pressed against a wall, you may need to reposition or create more working clearance before proceeding.
On fittings with a locking clip installed, remove the clip first. Locking clips slide over the collet to prevent accidental disconnection, and the fitting cannot be released until the clip is removed.
Step 2 – Push the Collet Squarely Against the Fitting Face
Using your thumb and index finger (or a collet release tool), press the collet inward directly toward the body of the fitting as squarely and evenly as possible. The goal is to push the collet away from the tapered section of the body so that the stainless steel teeth disengage from the tubing.
Applying pressure at an angle is one of the most common reasons removal fails. If the collet is pushed unevenly, one side of the teeth may release while the other remains engaged, making it feel like the tube is still locked in place. Keep your pressure centered and perpendicular to the fitting face.
Step 3 – Pull the Tubing Out While Holding the Collet Down
While maintaining firm inward pressure on the collet, use your other hand to pull the tubing straight out of the fitting. The motion should be smooth and in line with the axis of the fitting; do not twist or angle the tubing as you pull, as this can re-engage the teeth or damage the O-ring.
If you have done this correctly, the tubing should slide free with moderate, steady pulling force. If you feel significant resistance, stop and reassess rather than pulling harder. Forcing the tube out without fully releasing the collet is how teeth get stripped and fittings get damaged.
Step 4 – Inspect the Fitting and Tubing Before Reuse
Once the tubing is removed, take a moment to examine both the fitting and the tube end before moving on. Check the fitting for any visible damage to the collet teeth or O-ring. Check the tubing end for grooves, scratches, or a compressed or flattened profile. This quick inspection takes less than a minute and can prevent a frustrating leak the next time the fitting is connected.
How to Remove a Stubborn or Stuck Quick-Connect Fitting
Occasionally, a quick-connect fitting that has been in service for a long time, operated under high pressure, or been incorrectly installed will resist standard hand removal. Before you resort to force, try these escalating techniques to free a stubborn fitting without causing damage.
Using a Flat Screwdriver for Extra Leverage
If finger pressure isn’t enough to fully depress the collet, a small flat-head screwdriver can provide the extra mechanical advantage you need. Position the flat blade against the face of the collet and apply steady, even downward pressure while pulling the tubing with your free hand.
The key here is control. Use the screwdriver to press, not to pry. Levering the screwdriver against the fitting body rather than pushing straight down can crack the fitting, gouge the collet, or permanently damage the O-ring well. Work slowly, keep the blade flat and parallel to the collet face, and apply pressure gradually rather than in one sharp push.
Using a Dedicated Collet Release Tool
For fittings that resist even screwdriver pressure, a collet release tool is the cleanest and safest solution. These tools are designed to slide over the tubing and contact the collet evenly around its entire circumference, something neither fingers nor a screwdriver can reliably achieve.
To use one, slide the tool over the tubing and push it toward the fitting until it contacts the collet. Apply firm, even pressure to push the collet inward while simultaneously pulling the tubing. The 360-degree contact that release tools provide makes them especially effective on small-diameter fittings where uneven pressure is the primary obstacle.
If you work with quick-connect fittings regularly particularly on water filtration or RO systems a collet release tool is a worthwhile investment at just a few dollars.
Working in Tight or Confined Spaces (Under-Sink and Behind Appliances)
Under-sink installations and appliance connections are among the most common locations for quick-connect fittings, and they are also among the most difficult to access. Cabinet walls, supply lines, and drain pipes can all limit the hand and finger clearance needed for standard removal.
In these situations, a collet release tool becomes almost essential rather than optional. Its slim profile allows it to reach fittings in corners and against cabinet backs where fingers simply cannot get a proper grip. A right-angle or bent-blade screwdriver can also help reach awkwardly positioned fittings.
If the fitting is very close to a wall or panel, consider whether removing a cabinet shelf or temporarily disconnecting a neighboring component could give you the working room needed to do the job cleanly. A few extra minutes of prep can prevent damage to the fitting, the cabinetry, or your hands.
When to Stop and Replace the Fitting Entirely
If a fitting continues to resist removal after using a release tool and you’ve confirmed the system is fully depressurized, do not continue escalating force. At this point, the fitting itself may be damaged, corroded, or deformed in a way that is preventing normal release.
Signs that a fitting should be replaced rather than freed include: visible cracking or discoloration of the body, a collet that feels loose or spins rather than depressing, or tubing that appears fused or bonded to the interior. In these cases, cutting the tubing close to the fitting and installing a new fitting entirely is the safest and most efficient solution. Quick-connect fittings are inexpensive typically a few dollars each and replacement is almost always preferable to forcing a compromised one.
How to Remove Specific Types of Quick-Connect Fittings
While the core principle of collet depression and tube extraction applies broadly, different brands and fitting configurations have their own nuances. Here’s what to know before working with the most common types you’re likely to encounter.
Removing John Guest Quick-Connect Fittings
John Guest fittings are the industry standard in water filtration and point-of-use drinking water systems. Their collets are precisely machined and tend to have tighter tolerances than generic alternatives, which means they grip tubing very securely a feature that is excellent for leak prevention but can make removal feel more resistant.
For John Guest fittings, the standard collet-depression method applies. Press the collet squarely inward while pulling the tubing straight out. Because the collet on many John Guest fittings sits relatively flush with the fitting face, a John Guest-specific release tool (available directly from the manufacturer and most filtration suppliers) is often the easiest approach. Avoid using excessive side-angle pressure on John Guest fittings, as their precision bodies are more susceptible to internal damage from off-axis force than heavier-duty plumbing fittings.
Removing SharkBite Push-to-Connect Fittings
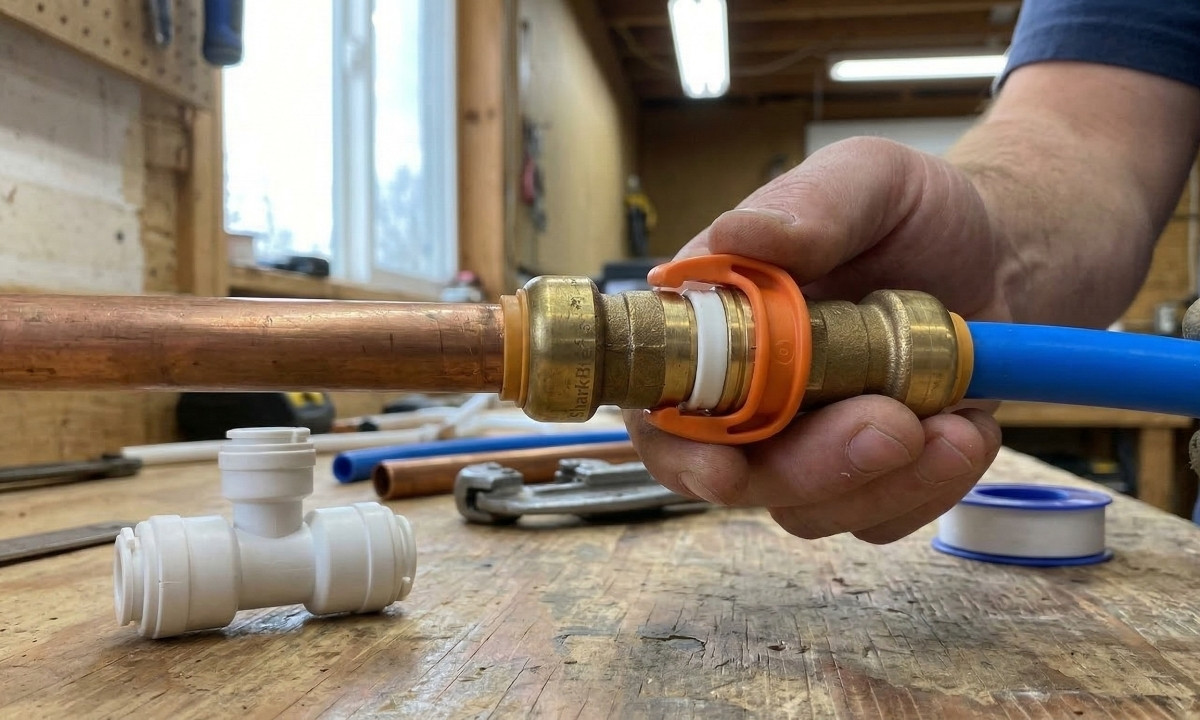
SharkBite fittings are commonly found in residential plumbing for copper, PEX, and CPVC pipes, and their removal process is meaningfully different from standard quick-connect fittings. Rather than a collet ring at the mouth, SharkBite fittings use an internal grab ring and a separate outer release collar.
To remove a SharkBite fitting, you need a SharkBite disconnect clip or disconnect tongs both available at most hardware stores. The disconnect clip slides over the pipe and is pushed against the fitting body to disengage the internal grab ring, allowing the pipe to be pulled free. Without the correct tool, SharkBite fittings are extremely difficult to remove without damaging the pipe or fitting. Do not attempt to pry or force a SharkBite fitting off bare-handed.
Removing Elbow, Tee, and Angled Quick-Connect Fittings
Elbow (90° and 45°), tee, and other angled quick-connect fittings follow the same collet-release principle as straight fittings, but working on them adds a layer of complexity. Because these fittings change the direction of the tubing, there are two or more connection points to release, and the geometry can make it harder to pull tubing in a straight line relative to each port.
When removing an angled fitting, work one port at a time. Depress the collet at one port and pull that run of tubing free before attempting the next connection. Trying to release both ports simultaneously often results in uneven pressure and incomplete release at both ends. If the fitting is mounted to a bracket or housing, it may be easier to unmount the fitting first before attempting tube removal.
After Removal – Inspection, Repair, and Reinstallation
Removing a quick-connect fitting is rarely the end of the job. Whether you’re replacing a filter, rerouting a line, or fixing a leak, what you do after removal is just as important as the removal itself. A few minutes of inspection and preparation here can prevent problems down the line.
How to Inspect Tubing for Wear, Grooves, and Damage
After removing the tubing from a fitting, examine the last inch or two of the tube end carefully. Run your finger around the circumference of the tube and look for grooves, score marks, or indentations left by the collet teeth. If the tube has been connected and disconnected multiple times, these grooves gradually deepen with each removal.
A tube with visible grooves or scratches cannot form a reliable seal against the O-ring. Even if the fitting grips the tube firmly, water will find a path through those channels and cause a slow leak. As a general rule, if you can feel grooves with your fingernail, the tube end should be trimmed back to expose fresh, undamaged material before reinstalling. Use a tube cutter rather than scissors for a clean, square cut.
Also check for kinks, flattened sections, or discoloration along the length of the tubing. Any of these can restrict flow or indicate tubing that is approaching the end of its service life.
How to Replace a Damaged O-Ring (Step-by-Step)
If your fitting was leaking before removal, or if you notice the O-ring is cracked, deformed, or has flat spots, replacing it before reinstalling is the right move. O-ring replacements are inexpensive typically $0.20 to $0.50 each and the process takes only a few minutes.
- Remove the collet by pulling it out from the mouth of the fitting with your fingers. It should slide out without tools on most standard fittings.
- Locate the O-ring seated in its groove further inside the fitting body. Use a thin, non-sharp tool tweezers, a toothpick, or a nail file to gently loosen and lift it out. Avoid metal tools that could scratch the O-ring seat.
- Press the new O-ring into place using a piece of tubing as a pusher. Push the tubing against the O-ring until it seats flat and evenly in its groove.
- Reinsert the collet by pressing it back into the fitting mouth until it clicks or sits flush.
Always use an O-ring that matches the original in both diameter and material. EPDM rubber is the standard material for water fittings and offers good resistance to most water treatment chemicals.
How to Ensure a Leak-Free Reinstallation
Before reinserting tubing into a quick-connect fitting, a few simple steps will dramatically reduce the risk of leaks:
First, confirm the tube end is cut cleanly and squarely. An angled or jagged cut is one of the leading causes of O-ring leaks. Second, measure and mark the insertion depth typically 3/8 inch from the tube end so you can confirm visually that the tubing has been pushed all the way past the collet to the O-ring. Third, consider lightly wetting the tube end before insertion. A small amount of moisture helps the tube glide past the collet and seat firmly against the O-ring.
After reinserting the tubing, pull on it firmly to confirm it is gripped securely. Then restore water pressure gradually and inspect the fitting closely for any signs of dripping before closing up your workspace.
When to Reuse a Fitting vs. When to Replace It
Quick-connect fittings are designed to be reusable, and in most cases they can be disconnected and reconnected multiple times without issue. However, there are clear signals that a fitting has reached the end of its useful life:
Replace the fitting if: the collet feels loose, spins freely, or no longer clicks into position; the body shows cracks, discoloration, or deformation; the O-ring seat is scratched or gouged; or the fitting has been leaking and O-ring replacement alone has not resolved the issue.
Reuse the fitting if: the body is intact, the collet engages and holds firmly, the O-ring is undamaged (or has just been replaced), and the tubing forms a snug connection with no play or wobble. Given that replacement fittings are inexpensive, when in doubt, replace. The cost of a new fitting is far less than the cost of water damage.
Common Mistakes to Avoid When Removing Quick-Connect Fittings
Even experienced DIYers make avoidable errors when working with push-connect plumbing fittings. These are the four most common mistakes and how to sidestep them entirely.
Yanking the Tube Without Depressing the Collet
This is by far the most frequent mistake. When someone encounters a fitting they haven’t worked with before, the instinct is to simply pull the tubing. But the collet’s teeth are specifically designed to tighten their grip when the tube is pulled outward. The harder you yank, the more securely the fitting holds on.
Not only does this approach fail to remove the fitting it can permanently damage the tubing by leaving deep grooves from the teeth, and it can bend or crack the collet itself. Always depress the collet before applying any pulling force, no matter how stuck the fitting seems.
Removing a Fitting While the System Is Still Pressurized
Attempting to disconnect a quick-connect fitting under pressure is both ineffective and potentially hazardous. When the collet is depressed on a pressurized line, the water pressure behind it can forcefully eject the tubing, spraying water across your workspace and potentially causing injury.
Beyond the immediate mess, pressurized removal can damage the O-ring by forcing the tubing past it at high speed, and can contaminate the fitting interior if it is splashed with dirty water or debris. Always shut off the supply and depressurize before removal no exceptions.
Using the Wrong Size Tubing on Reinstallation
Quick-connect fittings are precision-engineered for specific tubing outer diameters. A mismatch of even 1/16 inch can cause a fitting to appear fully connected while actually failing to seal properly. For example, a 5/16-inch OD tube inserted into a 3/8-inch fitting may grip and even hold pressure briefly, but will leak or release under normal operating conditions.
Before reinstalling, always confirm that the outer diameter of the tubing matches the push-in size of the fitting. These measurements are almost always stamped or printed on the fitting body. If the tubing is unlabeled, measure the OD with calipers before proceeding.
Damaging the O-Ring During Removal
The O-ring is the most vulnerable component in a quick-connect fitting, and it can be damaged during removal even when the removal itself goes smoothly. The two most common causes are angled pulling (which drags the tubing across the O-ring at an angle, cutting or rolling it) and using sharp tools near the fitting mouth without proper care.
To protect the O-ring, always pull the tubing straight out aligned with the axis of the fitting. If you are using a screwdriver to depress the collet, keep the blade away from the interior of the fitting and never insert it past the collet face. A damaged O-ring will cause the fitting to leak immediately upon reinstallation, so protecting it during removal avoids an extra repair step.
Frequently Asked Questions
Can quick-connect fittings be reused after removal?
Yes, in most cases quick-connect fittings are fully reusable after disconnection. The collet, O-ring, and body are all designed to handle multiple connection cycles. However, reusability depends on the condition of the fitting after removal. If the collet teeth are worn, the O-ring is cracked or deformed, or the fitting body shows any signs of damage, the fitting should be replaced rather than reused. Always inspect the fitting before reinstalling it.
Why won’t my quick-connect fitting release even when I push the collet?
The most common reason a fitting won’t release is that the collet isn’t being depressed evenly or deeply enough. Uneven finger pressure often releases only part of the collet, leaving some teeth still engaged. Try using a collet release tool to apply even 360-degree pressure. If you’ve confirmed even pressure is being applied and the fitting still won’t release, the system may still be pressurized, the fitting may be damaged internally, or the tubing may have grooves deep enough that the collet teeth are locked into them. In the last case, cutting the tube close to the fitting and fitting a new one is the most practical solution.
Do I need a special tool to remove quick-connect fittings?
For most standard quick-connect fittings in accessible locations, no special tool is required finger pressure is sufficient. However, a collet release tool is highly recommended for small-diameter fittings (1/4 inch is common in RO and filtration systems), fittings in confined spaces, and any fitting that has been in service for a long time. SharkBite fittings specifically require a SharkBite disconnect clip or disconnect tongs for safe removal. A collet release tool costs just a few dollars and is worth keeping in your toolkit if you work with these fittings regularly.
How do I know if my quick-connect fitting needs to be replaced rather than reused?
Inspect the fitting carefully after removal. Replace it if the collet feels loose, wobbles, or doesn’t snap back into position; if the body is cracked, warped, or discolored; if the O-ring is visibly damaged; or if the fitting was actively leaking before removal and the O-ring shows no obvious damage (which may indicate the fitting body itself has a problem). If everything looks intact and the collet clicks firmly, the fitting can generally be reused safely.
What is the difference between removing a SharkBite fitting and a standard quick-connect fitting?
Standard quick-connect fittings use an external collet ring that you depress to release the tubing. SharkBite fittings use an internal grab ring that bites into the pipe, with a separate outer release collar. To remove a SharkBite fitting, you need a SharkBite-specific disconnect clip or tongs you cannot simply press a collet ring as you would on a John Guest or similar fitting. Attempting to remove a SharkBite fitting without the correct tool risks damaging both the fitting and the pipe. For all other push-connect fitting brands, the standard collet-depression method described in this guide applies.
Conclusion
Key Takeaways for Safe and Effective Removal
Removing quick-connect plumbing fittings is a manageable DIY task once you understand the mechanics. The collet must always be depressed before the tubing can be pulled free this is the single most important principle. Always shut off the water supply and depressurize the system before you start. Use a collet release tool for small fittings, confined spaces, or stubborn connections. Inspect the tubing and fitting after every removal, and don’t hesitate to replace inexpensive components when they show wear.
For brand-specific fittings, know your fitting type before you start: John Guest fittings respond well to release tools, while SharkBite fittings require their own dedicated disconnect tool.
Next Steps – Reinstalling, Upgrading, or Replacing Your Fittings
Now that the fitting is out, you’re ready for whatever comes next. If you’re reinstalling the same line, trim the tubing end to expose clean material, mark your insertion depth, and reconnect carefully. If you’re upgrading your system adding a new filter stage, replacing aging tubing, or rerouting a line this is the ideal time to assess whether your current fittings are the right type and size for your setup.
Quick-connect fittings are available in a wide range of configurations: straight, elbow, tee, reducer, valve so if your current setup has been causing recurring issues, an upgrade may be simpler and more affordable than you think. When in doubt, consult a licensed plumber for anything beyond basic filter and appliance connections, particularly if you’re working on copper or CPVC pipe supply lines.
Have questions about a specific fitting type or installation? Drop them in the comments below. We’re happy to help you get it right the first time.